
Embark on a journey through the world of ductless mini split installation, where we unravel the intricacies of this modern HVAC system. Discover the advantages, components, and process involved in setting up these efficient units.
Learn how proper sizing, strategic placement, and the right tools contribute to a successful installation.
Overview of Ductless Mini Split Installation

A ductless mini split system is a heating and cooling system that does not require ductwork to operate. Unlike traditional HVAC systems that rely on ducts to distribute air, ductless mini splits use individual units mounted on walls or ceilings in each room.
These units are connected to an outdoor compressor unit by a refrigerant line.
Benefits of Installing a Ductless Mini Split System
- Energy Efficiency: Ductless mini splits are more energy-efficient than traditional systems because they don't lose energy through ductwork.
- Zoning Capabilities: Each unit can be controlled separately, allowing for customized temperature settings in different rooms.
- Easy Installation: Ductless systems are easier to install since they don't require ductwork, making them a great option for older homes or room additions.
- Improved Indoor Air Quality: Without ducts that can accumulate dust and allergens, ductless systems can help improve indoor air quality.
Components Involved in a Typical Ductless Mini Split Installation
A standard ductless mini split installation involves the following components:
- Outdoor Compressor Unit: This unit is placed outside the home and houses the compressor, condenser, and expansion valve.
- Indoor Air Handling Units: These units are mounted in each room and are responsible for distributing hot or cold air.
- Refrigerant Lines: These lines connect the outdoor unit to the indoor units and circulate the refrigerant needed for cooling or heating.
- Control Panel: A central control panel allows users to adjust settings, such as temperature and fan speed, for each indoor unit.
Sizing and Placement Considerations

When installing a ductless mini split system, it is crucial to ensure that the unit is sized correctly for the space it will be cooling or heating. A unit that is too small will struggle to reach the desired temperature, while a unit that is too large will cycle on and off frequently, leading to energy inefficiency and wear and tear on the system.To determine the ideal placement of the indoor and outdoor units, consider factors such as the layout of the space, the location of windows and doors, and the direction of sunlight.
The indoor unit should be placed in a central location for optimal airflow, while the outdoor unit should be positioned in an area with good ventilation and minimal obstructions.To maximize efficiency, avoid placing the indoor unit near sources of heat or cold air, such as appliances or drafty windows.
Additionally, ensure that the outdoor unit is placed on a stable surface and is free from debris or vegetation that could obstruct airflow. By strategically placing both units, you can ensure that your ductless mini split system operates efficiently and effectively.
Determining the Ideal Unit Size
When sizing a ductless mini split system, calculate the cooling or heating capacity needed for the space based on factors such as square footage, insulation levels, and ceiling height. Consult with a professional to ensure that the unit is sized correctly for optimal performance.
Placement Tips for Indoor and Outdoor Units
- Install the indoor unit at least 7 feet above the floor for proper airflow distribution.
- Position the outdoor unit in a location that allows for easy access for maintenance and repairs.
- Consider shading the outdoor unit from direct sunlight to prevent overheating and improve efficiency.
- Avoid placing the indoor unit near curtains, furniture, or other obstructions that could block airflow.
Installation Process

Installing a ductless mini split system involves several steps to ensure proper functioning and efficiency. From mounting the indoor and outdoor units to making electrical and refrigerant line connections, each step is crucial for a successful installation.
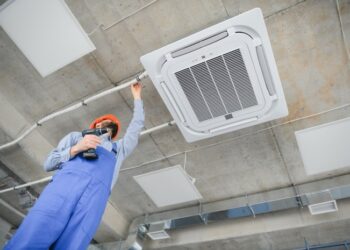
Mounting the Indoor Unit
When mounting the indoor unit, it is essential to place it in a location that allows for proper airflow and distribution of conditioned air. The unit should be installed on a sturdy wall to support its weight and ensure stability.
Make sure to follow the manufacturer's instructions for the correct height and angle of installation.
Mounting the Outdoor Unit
The outdoor unit should be placed in a well-ventilated area away from obstructions that could restrict airflow. It should be mounted on a stable surface to prevent vibration and noise issues. Proper clearance around the unit is necessary to allow for adequate airflow and maintenance access.
Electrical and Refrigerant Line Connections
After mounting both the indoor and outdoor units, the next step is to make the electrical and refrigerant line connections. This involves connecting the indoor unit to the outdoor unit using insulated refrigerant lines and electrical wiring. It is crucial to follow the wiring diagram provided by the manufacturer to ensure proper connections and avoid any electrical issues.
Proper installation of a ductless mini split system is essential for optimal performance and energy efficiency.
Tools and Materials Needed

When it comes to installing a ductless mini split system, having the right tools and materials is crucial for a successful installation process. Here is a list of the essential items you will need:
Tools Required:
- Drill and drill bits
- Screwdrivers (Phillips and flathead)
- Pliers
- Adjustable wrench
- Level
- Hole saw
- Measuring tape
- Wire cutters/strippers
- Vacuum pump
- Manifold gauge set
Materials Needed for Mounting and Connecting Units:
- Mounting brackets
- Bolts and screws
- Refrigerant lines
- Condensate drain line
- Electrical wires
- Insulation tape
- Wall sleeve or line set cover
- Concrete pad (if needed for outdoor unit)
Specialized Equipment:
It's important to note that certain installations may require specialized equipment depending on the complexity of the job. This could include a ductless mini split manifold gauge set for checking refrigerant levels, a vacuum pump for removing air and moisture from the system, or a line set cover for concealing the refrigerant lines.
DIY vs. Professional Installation
When it comes to ductless mini split installation, homeowners often face the decision of whether to tackle the project themselves or hire a professional. Both options have their own set of advantages and disadvantages, depending on the individual's skill level, experience, and budget.
Advantages and Disadvantages
- DIY Installation:One of the main advantages of DIY installation is cost savings, as you can avoid paying for professional labor. It also gives you the flexibility to work on your own schedule. However, DIY installation requires a certain level of technical skill and knowledge, and mistakes can lead to inefficiencies, voided warranties, or even safety hazards.
- Professional Installation:Hiring a professional ensures that the installation is done correctly the first time, reducing the risk of potential problems in the future. Professionals have the necessary expertise and tools to complete the job efficiently. On the downside, professional installation can be more expensive than DIY, adding to the overall cost of the project.
Feasibility and Recommendations
- DIY installation may be feasible for individuals who have experience with HVAC systems, electrical work, and construction projects. If you are confident in your abilities and are willing to invest the time to research and follow installation instructions carefully, DIY can be a rewarding option.
- Professional help is recommended for those who lack the necessary technical skills or are unsure about the installation process. Complex installations, multi-zone systems, or challenging placements may require professional expertise to ensure optimal performance and longevity of the system.
Risks and Challenges
- Improper Installation:One of the biggest risks of DIY installation is improper installation, leading to leaks, inefficient operation, or even safety hazards. It is crucial to follow manufacturer instructions and local building codes to avoid these issues.
- Warranty Concerns:DIY installation may void the manufacturer's warranty if installation errors are made. This can result in costly repairs or replacements down the line, negating any initial cost savings from DIY installation.
Maintenance and Troubleshooting

Regular maintenance is essential to ensure the efficient and long-lasting operation of your ductless mini split system. By performing simple tasks regularly, you can prevent potential issues and keep your system running smoothly. In case of any problems, knowing how to troubleshoot common issues can help you address them promptly and effectively.
Additionally, professional maintenance by trained technicians is crucial to ensure the system's longevity and efficiency.
Regular Maintenance Tasks
- Regularly clean or replace air filters to maintain good airflow and indoor air quality.
- Inspect and clean the indoor and outdoor units to remove any debris or obstructions that may affect performance.
- Check refrigerant levels and ensure there are no leaks in the system.
- Inspect the condensate drain line for clogs and ensure proper drainage.
- Test the thermostat and settings to ensure they are functioning correctly.
Common Issues and Troubleshooting
- If the unit is not cooling/heating properly, check the air filters, refrigerant levels, and airflow for any blockages.
- If there is water leakage, inspect the condensate drain line for clogs and ensure proper drainage.
- If the unit is making unusual noises, check for loose components or debris in the system.
- If the system is not turning on, check the power source and thermostat settings.
Professional Maintenance Importance
Professional maintenance by certified technicians can identify and address potential issues before they escalate, ensuring optimal performance and efficiency of your ductless mini split system.
Outcome Summary

In conclusion, ductless mini split installation offers a convenient and energy-efficient solution for your heating and cooling needs. By understanding the process and maintenance requirements, you can enjoy a comfortable indoor environment all year round.
Essential Questionnaire
What is a ductless mini split system?
A ductless mini split system is a heating and cooling system that does not require ductwork to distribute air, making it a versatile and efficient option for homes.
How do you determine the ideal placement of indoor and outdoor units?
The ideal placement depends on factors like room size, layout, and insulation. Indoor units should be mounted high on walls, while outdoor units need proper clearance for air circulation.
What tools are required for a ductless mini split installation?
Tools like a drill, wrench, and tubing cutter are essential. Specific materials include mounting brackets, refrigerant lines, and electrical wiring. Specialized equipment like a vacuum pump may also be needed.
When is DIY installation suitable?
DIY installation is feasible for those with experience in HVAC work and electrical connections. However, professional help is recommended for complex installations or if unsure about the process.
How do you troubleshoot common issues with ductless mini split systems?
Common issues like refrigerant leaks or sensor problems can be addressed by checking connections, cleaning filters, and scheduling professional maintenance. Regular upkeep is key to preventing major malfunctions.


